Pages

Thursday, 10 June 2010

Funky pink noticeboard

So I made my noticeboard! It was acutally super easy and only took a couple of hours. I think
if I was doing it again (I might make another for my sister), I would be a little more accurate with the measuring and marking for the ribbons, and would als
o finish the back with some nice fabric and trim (I won't show you the back of this
one, but it's pretty agricultural!).

What I used:
  • piece of MDF: the stuff I used is 5mm thick which is not too heavy to hang but sturdy enough to withstand the stapling and other stuff without warping
  • cork tiles: these were surprisingly hard to find..! I found some self adhesive ones which were actually quite spenny (£11 for 4, each tile 12" square). They can be easily cut to size with a penknife. You need enough to cover your MDF.
  • batting: I got the cheap polyester fluffy stuff you buy from big rolls in John Lewis. Again, enough to cover your MDF.
  • fabric to cover: I chose a shocking pink cotton velvet. Lush!
  • Ribbon: to make the webby bit at the side to slip envelopes etc into. I think grossgrain is probably better as it won't stretch but will see how this stuff lasts - I used some satin ribbon I had in my stash.
  • Tools: a staple gun (awesome) - it was about £15 from Peter Jones, hammer, ruler, flathead screwdriver (for getting out staples if you make a mistake), and some upholstery pins (the kind you see nailed into the trim around chairs and stuff)

Step 1

I found it easiest to work on the floor for most of the tim
e. You need to start with your piece of MDF flat on the floor so it is easy to affix the cork.


Step 2

Glue on your cork tiles. The tiles I used were self adhesive but if you can't find those, you could just glue them I guess - someone in a DIY store would be able to recommend the right kind of adhesive for glueing cork to wood. Out of luck rather than by design, my bit of MDF was almost exactly two feet wide, so I didn't need to do too much
hacking of the cork... I don't think it really matters if you don't get the cork right up to the edge of the MDF as the whole lot gets covered by batting and fabric anyway.


Step 3

Cut your batting to size. I wanted to use batting so the noticeboard had a nice soft squishy quality - fabric straight on top of the cork would have been quite flat and also the batting fills out the fabric a bit I think. I was pretty haphazard about cutting the batting too - I don't think it needs to be super exact. I just put the batting on top of the cork (the two surfaces sort of stick together because the cork has sticky-out bits which snag on the fluffiness of the batting) and cut around it. I stapled the four corners to keep the batting in place while I was putting the fabric on.

Step 4

Stapling the fabric. Again I was pretty rough and ready here... though you probably want to keep the fabric and the MDF on the straight grain I guess. Make sure the fabric is as bit as the MDF with at least two or three inches to spare on each edge. I found it easiest to do one narrow end first - lay the fabric on top of the batting and then turn the whole thing over, and fold the narrow edge over onto the back of the MDF and staple. I stapled about every three inches.

Then do the other short end - pull the fabric so it is nice and taut but not overstretched. Then do the long sides in the same way.I folded the corners in the same way I would wrap a present, and put a staple over the corner folds. I was almost tempted to just leave it how it was without ribbon - looks pretty cool I think!


Step 5

I wanted one side of the notice board to have ribbon webbing on it for putting letters in and stuff. Draw a vertical line with chalk where you want the division to be (I actually just pinned a ribbon on for this as per the pic, but marking this line would have been better). To mark the lines for the ribbon, I drew lines about 2.5" apart at 45 degrees with chalk.

I then stapled the ribbons over the lines where they crossed the vertical line (mine were a bit long, but I trimmed them afterwards), and then on to the back of the MDF (being careful to let the ribbon follow the shape of the edge of the board). Once I had done all of the ribbons going one way, I did those going the other way using the same method. I then stapled a wider piece of ribbon over the vertical line (I only stapled this on the back, where the ribbon wrapped over the edge and on to the back of the MDF) and tapped in the upholstery pins where the ribbons crossed. You don't need to do this every place the ribbons cross especially if you want to leave bigger spaces for letters, but it is good to make sure the vertical piece of ribbon is secure. Et voila! I hung it using some little screw in hooks (I used two on the back of the noticeboard) with picture wire between them, then a good old fashioned nail in the wall. You could actually just leave it propped up on a desk though.

I think it's ok for a first attempt - but most of all, it will be useful!


Tuesday, 8 June 2010

Yet ANOTHER changearound in the sewing room...

This time, with the help of Ikea and my lovely husband, I have a lovely nice long sewing table, more drawer space and some cool shelves to put stuff on. It's so nice being able to really stretch out and have a clear space for sewing, and also to look out of the window onto the gardens!

I think I am going to make a
noticeboard to hang to the right of my new table, so I can pin up ideas and pictures and pattern instructions and stuff. I have got a piece of MDF all ready to go, and some self adhesive cork tiles, some batting and some jazzy pink cotton velvet to cover it. Not exactly sure how it will turn out, so watch this space!

Sunday, 6 June 2010

GAAAAGGGHHH...

I have been sewing - but not much posting! I made a start on Burda 113 from the 8/2009 edition in some lovely silk. I have so far almost finished the top half - I used some of the gorgeous cerise silk I got on Goldhawk Road a few weeks ago. Frustratingly though, I must have added on too much seam allowance at the bottom of the back, because after sewing the side seams I realised that there is too much fabric i the back armhole - you might just be able to see from the pic how there is too much floatiness going on in the back of the sleeves? Also, again, REALLY frustratingly, I must have done something wrong on the ruched front self facing because it wasn't long enough to actually make a self facing for the inside front, so the seam is on the neckline. For some stupid reason, I sewed this with a zig zag stitch, which you can see peeking through the fabric.

So annoyed. Basically something must have went awry when I was copying the pattern.

Not sure the best way to fix this stuff - for the front perhaps I unpick the zig zag seam, and maybe sew another bit of the cerise silk long enough to fold to the inside and make the self facing? Notice how from the front the bottom edge is curved - I think it is supposed to be straight so maybe I have more fabric I can pull up and wrap over to form the self facing...? Another issue I think is that the silk is heavy so it pulls the inside lining up where the self facing is supposed to be (does that make sense?) - maybe once the lining is sewed at the waist it will be a bit better.
For the sleeve, think I am going to have to unpick the side seams and sew them again. Annoying. Any other ideas?? Have to say, totally NOT loving the brevity of the Burda instructions... next project is going to be from a PROPER PATTERN with, like, PAGES of instructions....

BTW, apart from these miscellaneous disasters, this silk is a JOY to sew with. So heavy and feels so lovely!
Now to find my seam ripper.....

Friday, 7 May 2010

I'm hexed!

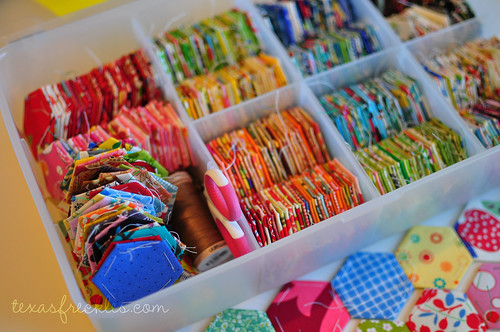
While surfing the sewing interweb, I found this and thought it was such a cool picture. Then I found the blog of Texas Freckles, and read about her hexagon piece-along. And thought I might have a little go... the thought of hand sewing I could do almost anywhere was awesome - a little bit at a time whenever I have a spare few moments. And a weird and funky quilt to show for it at the end! So I printed out some sheets of 1" hexagons to cut up and found some scraps of fabric I had leftover.... wow - it is so addictive! But awesome fun. The patch of sewn toghether hexes I did just to see whether I would in fact be able to sew them together neatly, but it all turned out ok for that little sample. It takes something crazy like one thousand 1" hexagons to make a sensibly sized quilt. Maybe I will get bored before then... but it is so nice to have something creative to do while sitting on the sofa watching Hollyoaks (busted). I think I am going to piece the hexagons together in bands 3 or four wide diagonally - one strip coloured and then one made up of only off-white coloured hexagons. There are lots of ideas out there. The only thing that stands between me and a fab hand sewn quilt is about... oh, 900 hexagons??

Thursday, 22 April 2010

Where are you, UK sewists?

In light of my recent foray into quilting, I have be doing a little cyber-browsing of quilting blogs and websites. Wowzers – quilting is VERY popular in the US! Not sure what other UK sewists have found, but I have noticed that sewing and quilting is much more popular in the US than it is here. Or at the very least, there are a lot fewer people who blog about it here… There has been a resurgence of crafting in the UK – particularly with respect to knitting which has become very trendy in the past couple of years (I am STILL knitting the back of a baby cardigan I started AGES ago – the bloody pattern is written in Greek or something) – a result of the credit crunch and the desire to improvise mainly, but I think people have also started to realize how satisfying it can be to make things; either for yourself or to give away. I haven't yet got to the stage where I have (a) made very many things, or (b) considered that any of the things I have made would be welcome gifts. That is something I hope quilting might fix – quilts must make lovely presents. I know I'd love to be given one! If only they didn't take so long to make… though I think that is probably just practice. And the fact that the quilt I have decided to make as my first appears to have about one billion teeny tiny pieces (I am prone to exaggeration).

A couple of my girlfriends have expressed an interest in sewing / knitting / quilting (one is making a rag rug – though I think her current rate of progress is not dissimilar to that of my baby cardigan) and we keep talking about having some sort of sewing circle. Maybe just meeting up one weekend or evening to chat and sew (or 'rug' – whatever the 'doing word' for that is) – a few cocktails, cupcakes, some Lady Gaga… Perhaps I should be more aggressive in my corralling and just propose a date.


Do any of you meet with like-minded people to natter and stitch? If so, how did you get started?

Monday, 19 April 2010

Who'da thought it?!

My new sewing machine came with, like, a zillion new feet. I have only experimented with about three of them so far, but - THESE LITTLE FEET DO ALL SORTS OF COOL STUFF! Rolled hem foot -BOOM - nice little neat rolled hem! I'm not absolutely certain I'm using it properly though - the instructions in the manual aren't the most clear... but it seems to produce an ok result... how do I know exactly how wide to finger-fold the hem??...

Tonight I have been using the 1/4" seam foot to help me sew some of the strips together for the quilt I'm making. This little baby has a little metal guide on it to make sure that the seam is actually 1/4" - so far proving to be much more accurate than my current magnetic seam guide thingy...

I am so keen to find something which divulges all the awesome ways I can use the special feet that came with my machine when I am making garments. The instruction book is informative but not very inspiring..!

Do any of you have any interesting techniques or finishes using different feet that you'd like to share with me??


Friday, 16 April 2010

New arrival...

My sewing-related spending binge has continued unchecked (this is REALLY IT for a while ever) and later today I shall be taking delivery of a Janome 6600P - how exciting is that! I decided a little while ago that maybe it was time to upgrade from my sweet but very basic J3-20 - I think this will be a giant leap... it obviously has about a million more features than I need or will probably ever use, but I am so looking forward to playing with it when it arrives. I did a fair bit of research on the internet and joined a Janome6600p-specific Yahoo group (!), and also went in to Peter Jones on Oxford Street to have a test drive (though I have to admit I didn't buy it from there but from a great UK based site which had £200 off the RRP) - I was amazed at how smooth and quiet it was - and (this might not be the right word) sure-footed! Aside from all the wizzy stitches it can do, the quality of the straight stitch was great and am pretty excited about this whole Accu-feed thing it has going on (supposed to make sewing different stuff together easier). I read that Sew-cial Butterfly is also waiting for the exact same machine to be delivered!

No doubt I will be overwhelmed by the instruction manual - but SO looking forward to making stuff with this!

Anyone else have one of these machines and have any experiences (good or bad) to share??

Thursday, 8 April 2010

Fabric splurge

Woops.

I won't even bother with the faux oh-how-did-I-manage-to-spend-so-much-on-yet-more-fabric apology. There was fabric shopping. The end.

But BEHOLD!

This paint splattery lushness I got from MacCulloch & Wallis on Tuesday. It was pretty spenny... and probably not to everyone's taste, but I
thought so amazing! It is a cotton with something (cannot remember now due to excitement, but I did find out) woven on top, very slightly metallic. But isn't the print really Marc Jacobs or Matthew Williamson-esque?? I love it. It will make such a funky dress (or maybe summer coat - but not sure I'm brave enough to try a coat yet) - desperate to find the right pattern for it though. It has quite a bit of body (is that the right word?), I think because of the sort of two layer thing it has going on.
Any suggestions?


Then from Shaukat I got two pieces of Liberty silk - one funky peacock feather purple which I thought would make a nice sort of slinky but
not-too-clingy dress... Quite an unusual fabric I thought - but it felt amazing! I have never sewed with this type of silky silk before (as opposed to dupion type which I made Jackie from) so not sure how I will fare...

The second piece was a little more
conventional and I thought would make a nice tea dress - the print is actually quite small and in a pale blue - from a distance the fabric looks a lot lighter than in this close up shot. But how nice for Sunday tea or lunch with the in-laws, don'tchathink?

I need some pattern suggestions... I also picked up a load of cheap cotton for making toiles which the lady at MacCulloch & Wallis kindly sold me for 50p a metre as it was a bit dusty. So armed and dangerous! I acquired the Michael Kors Vogue 1117 which I am so keen to try but concerned it might be a bit advanced...?! The thought of cutting into this prime stash is pretty nerve racking... Though that's what all that cheap cotton is for, right??

Armed with fabric and certainly dangerous - roll on the next big sewing sesh!

Tuesday, 6 April 2010

Finished!

Over the bank holiday weekend I finally finished the Burda top I started here - I thought it very disciplined of me to finish it before moving on to the next project. Here are a few pics of it. I am generally happy with it, though I didn't bother making the button holes on the sleeves (just sewed on buttons as trimming) as I didn't need to be able to open and close the vents. Similarly I didn't bother with the tie side, just left it plain and sewed another button on there too. The finish on the neckline is a bit dull and I wish I had done something a bit more interesting or fun than the pattern directed - maybe just put the binding on so you could see it from the front too. I used french seams for all of the seams, after being inspired by the incredibly neat finish on all of Amanda's creations - I guess practice will eventually make somewhere closer to perfect for me..!

The fabric is a Rose & Hubble remnant I got from the most
amazing fabric shop - Shaukat - which is actually only ten minutes walk from me. I was down there at the weekend and got some amazing Liberty silk - more on that in another post! It is quite a sweet little top for the nicer weather we hope to be getting soon - in the picture I am wearing it with jeans post-work, but I actually wore it to the office today tucked in to a black skirt.

So I am starting to feel like I am a bit more in the sewing groove now, and ready to tackle a nice frock I think - especially given what happened when I went to Shaukat.....

Friday, 2 April 2010

Straight lines


So since my last post, I STILL haven't managed to do any sewing yet due to work / post wedding wedmin / housework. Today Husband (!) and I had yummy brunch and then went to see Clash of the Titans (meh) and this afternoon I have spent a couple of hours reorganising my sewing room our study - I thought it might inspire me further to break out the old sewing machine. I think the new layout is quite good - now two workstations (bottom left of room) and almost the full table for cutting out... we'll see.

Anyway, to get me back in the sewing groove I thought I'd start with (or really, continue with) the quilt I started months ago. Although I am primarily learning to sew to make clothes, I really love gorgeous bed linen and I thought it awesome to have some colourful quilts to chuck over plain white sheets (I buy almost exclusively plain white bed linen - looks so clean and fresh!) and a few months ago I bought this lovely book called Jelly Roll Quilts by Pam & Nicky Lintott and started a cool looking quilt called 'Sparkling Gemstones' (I know, bit lame) with some fat quarters I had bought for the purpose. Then the wedmin got me... so I picked it up today thinking I'll crack on with a few straight lines to get me warmed up before starting my next fashion proj. Though boring, sewing in a straight line is quite mindless and theraputic (in small doses!).

So for my next fashion proj, thinking the simple blouse no. 102 from this month's Burda
. Do you think that would be ok in a silk? It does seem to have dreaded buttonholes though... gagh.

Has anyone made this yet?

PS for those of you who have asked, we went to the Maldives for our honeymoon - bliss!