Pages

Monday 14 December 2009

Feeling a little festive...


It has been a while since I blogged, and even longer since I did any sewing! I've been pretty busy at work as the year-end approaches, wedmin has taken up more time than I would like and I also seem to have started a new hobby – a sort of cross between an art journal and scrapbooking! More on that later, check this and this out - how awesome. I have (very sporadically) kept a diary since I was quite young. I always revert to writing at times of stress. It is cathartic I think. So I'm going to try this...

Anyway, Christmas is now almost upon us, and I find myself in the position (yet again) of having purchased no Christmas presents. I would actually like to make some things to give as presents but I'm not sure (a) what or (b) whether anything I make would be good enough to give away! I have a pattern for a top that would be nice for my mammy… and it is quite simple – perhaps I will try that. I also thought to make quilts – but pieced ones take a while (at least, the one I am doing is taking a while!). But then I saw a great post by Gertie where she made a baby quilt just from two pieces of fabric.

Anybody have any good ideas for nice and easy to make Christmas gifts?!

I'm hoping to escape the work locker nice and early some nights this week and get that flowery top finished… promise some sewing updates soon!
Thursday 3 December 2009

Next up...


I have been talking about making some nice blouses and skirts for, like, AGES... so now is the time I think. There was a nice pattern for a blouse in this month's Burda which I am going to make up. I have been a subscriber to Burda for - wait for it - three WHOLE MONTHS now, and I haven't made anything from their patterns yet. I really like this blouse though - I think I am going to adapt the bottom slightly so that instead of tying with those long ties it just has a lapped band at the bottom with nice pearl buttons or snaps or something. That is much easier to tuck into a pencil skirt....

I cut the pattern out one night earlier this week. I have to say, the whole tracing palaver wasn't as traumatic as I thought it was going to be. Though I guess this pattern only has five pieces... anyway, having my nice new expanse of table top certainly made the whole procedure easier, despite the kitties trying to 'help'. I am hoping to eventually make this up in the lovely blue silk I got from gorgeous fabrics (and loads of others depending on how I like the pattern), but first I am going to make it up in some nice flowery fabric I had in my stash, a piece of Rose & Hubble cotton which I bought from the shop just down the road from me which sells ex Liberty fabrics (it is like an Aladdin's cave in there). I really like the fabric so don't want to mess it up but I reckon the pattern is pretty straight forward so hopefully relatively low risk... and inspired by the AMZINGLY neat work of Amanda I think I might try French seams on the inside - no thread to fray, woo hoo!

Sunday 29 November 2009

Finished

Finally finished the jacket - other than the buttonhole which I think I will get done professionally. The last thing was to sew the bottom edge of the lining which I managed to do tonight (finally fully understand the phrase 'bag the lining'). Here is a pic of the jacket on Maud - I will take some pictures of me wearing it when I eventually do - I think it would look nice with slim blue jeans, a white shirt, black heels and some pearls.

I am pretty happy with the way it turned
out - though the fabric is not great and the shoulders have already stretched (I taped them) a bit which is annoying. The pattern only called for interfacing at the front lapels and facings, and the collar. Given the weave of the fabric is so loose, I probably should have interfaced the whole thing. Though the lining definitely helps to hold the shape together. Also I'm not certain I have sewn the bottom edge of the lining properly... the lapel facing is sewn to the lining vertically all the way to the bottom but where it is sewn to the hem edge horizontally it is about half and inch from the bottom so there is a graduated curve where the two meet together... not sure that's right... hmmm. I think I should have read one of my 'how do do lining' books before I did the last bit. Also I didn't tack the seam allowances of the lining and shell together at the waist as the tutor suggested (forgot)....I will know for next time though.

Overall, given it is only the fifth thing I have ever made, I think it's ok and I've learned some things for the next project, namely:

  • interface floppy / loose fabrics
  • pay more attention to finishing the lining
  • pink the edges of lining fabric

Saturday 28 November 2009

Movearound!

Thought it was time to reorganise my sewing room our study and so on Thursday night I started shunting around the furniture... I managed to push together our two Ikea book cases on their sides to make a NICE BIG SPACE FOR SEWING! Hurrah! Just need to get some shelves up and my noticeboard done (I bought all the bits ages ago to make a fabric noticeboard but have never actually bought the cork / MDF to put it all together), and also hang the tonnes of pictures we have never put up. Am pretty pleased with how it has turned out - lots more room to work! You can see on the cutting mat is a load of fabric I am going to use to make a quilt. I've never made a quilt, but I love the idea of something I can pick up and put down. And also making a quilt seems for the most part to involve sewing in straight lines - how hard can that be right?! (uh oh)...

I'm going to try and finish Polly tonight or tomorrow - and maybe start something new! Got this month's Burda and there is a cute, skirt and top I'm pretty keen to make up. As ever though - I'M SOOOOO SLLLOOOOWWW!

Monday 23 November 2009

Almost done...

Terrible week for blogging here - many apologies.. However, on the good side, very nearly almost finished Polly... this week was my last class at LCF (got a certificate and EVERYTHING.. ) and as expected everyone was in a real rush to get finished. Thankfully I wasn't in that much of a rush... and had basted the peplum to the top part of the jacket before class, so I just needed to decide on the position of the pockets and stitch it, and then of course there was Putting In The Lining to do. And shoulder pads.

The tutor told me to sew the shoulder pads to the seam allowance, just next to the stitching of the set in sleeve, and aligning the outside edge of the shoulder pad with the edge of the seam allowance. Which I did. On the machine. Not sure if I was supposed to stitch them on by hand?... the shoulders have a little body in them but I used no sleeve heads so they don't have the nice round 'puff' at the top.
Which reminds me - THIS FABRIC IS HORRIFIC. It is really stretchy and frays easily - in hindsight I should have interfaced the whole thing. I put some seam tape on the shoulder seams and also on the underside seam in each sleeve - think it could end up losing its shape after a couple of wears. The shoulders are already wider than they were on the toile.

Anyway. The pattern instructions for finishing the jacket weren't great... there was no facing or interfacing at the hem (despite the fact that in one of the drawings there looked to be some shading indicating interfacing, there was no actual instructions to cut any out or fuse any on) so the tutor suggested I interfact the depth of the hem, which I did. Then I had to catchstitch the hem about 1cm into the hem allowance from the edge. By hand. With a needle and thread. And my fingers. By hand. You may be ascertaining that hand sewing is not my forte... It actually didn't turn out too bad, but I haven't yet finished the bottom hem.


Was actually easier to attach the lining than I thought it was going to be. Once I'd catchstitched the hem, I sewed around the out side edge of the lining from the bottom of one side of the jacket right around the neck and down the other side (see pic left), which left the bottom hem edge and the sleeves left to do. To attach the lining to the sleeves (which have a facing on the inside) I basically put the jacket on as if I was wearing it, which pushed the sleeve lining into the sleeves. I then folded the edges of the lining and the sleeve together at the edges (how it would look when finished) and put a pin in, and then put my hand between the shell and the lining of the jacket at the back and pulled the sleeve back through (does that make any sense?) so I could then put the edges of the lining and the facing together and pin them. Sewing the sleeves is a little tricky as you have to sew all the way around what I guess is the wrist, and move the rest of the jacket around that....

Anyway, so I did that and MIRACULOUSLY, it worked! I will post some more pics when I have finished off the hem. The last thing to do will be to get a buttonhole put in for the closing at the front.... Didn't have time to do either of these things in class but it shouldn't take too long to sew the lining to the hem and I think the buttonhole I might get done professionally somewhere....

Thursday 12 November 2009

Apathy...

I finished the toile of Vogue 8511 (obviously too big as I thought - should have cut a size 10)... and you know what? I'm not sure I want to make it up yet.

I am not loving the pouffiness of the skirt. The pattern envelope suggests lightweight jersey, lightweight crepe, lightweight tweed and linen - none of which I have. I think it would be too bulky in a wool. I have a silky satin with spots on, but think it might be a bit too much 'all over'. I could use some of that lovely jacquard silk... but not sure I love the pattern enough! And then it would have to be a 'going out' dress which would mean hacking a good six inches off the length. Hmmm. Sort of disappointed I don't love it. Maybe I'd be more keen if I could get excited about which fabric to make it up in. I had been thinking about making the bodice and skirt in contrasting colours - perhaps the top half in the cream polka dot silk I got from Gorgeous Fabrics, but not sure what to do for the skirt. Maybe I could do the skirt in the black jacquard?...


GAGH.

Wednesday 11 November 2009

Speed the likes of which has never been seen before in my sewing room

Last night I managed to escape from work awesomely early and so when I got home I was desperate to start a new project. Ripping off the 'Dream' dress seemed like too difficult a place to start, and so I thought I'd crack on with the lovely Vogue 8511 (which A Sewn Wardrobe has just finished) – a dress with sleeves. Dresses with sleeves are so glam at the moment. I haven't quite decided which fabric to make it in… maybe some of the lovely Loro Piana wool I got recently, which would be nice for work? But in any event I thought I'd make a toile of it first. All this London College of Fashion stuff has really gone to my head! The main reason I wanted to make a toile was because I wasn't certain which size to cut… I think probably a ten would be right but the measurements on the envelope put me at a pattern size 14 (I am a UK dress size 8 or 10)… so I cut out a 12 and we'll see how well it fits.


First I cut out the pattern, and then dug out some cheap cotton I had bought months ago for this sort of thing and started pinning and cutting out the fabric. To be fair the pattern is a very simple one and there aren't many pieces (I think there are seven?) but I WAS SO QUICK! I'm not sure if I'm just getting a little faster at doing things because I've had a little more practice, but in three hours I had cut out the pattern, cut out the fabric, and sewn the front and back bodice sections together. Some of you reading this are probably thinking "that took her three hours?!", but it has been known for cutting out the pattern alone to take me longer than that… Tonight I am hoping to get the toile finished and then I can assess what I need to change (I am hoping nothing, other than maybe cut it out in a smaller size!) and maybe even cut out the fabric… whoa there, don't want to get too carried away.

Tuesday 10 November 2009

Next project(s)?...

Now that the end of my jacket is in sight – along with the end of my course at LCF (only two Saturdays left to go!) – I have started to think about my next project.. So far I have been quite good and have only had one project going at a time. But I think I can probably handle more than one thing at a time… as long as one of the two is pretty straightforward...

I have been thinking about sewing a coat, but like Gertie I am concerned I might be biting off more than I can chew. I ordered McCall's M5766 (pic right) which I think would be lovely in the peachy pink flannel I got from Gorgeous Fabrics] (did I mention a giant box arrived all the way from the US of A last week – MOST EXCITING!), and armed with my recent jacket-making experience (and a new book - 'Tailoring: The classic guide to sewing the perfect jacket') I have a little more experience. But taking on a coat is still pretty daunting. I think that it might have to be my 'in the background' project. Though I'd like to get it finished in a few weeks so I can wear it during the increasingly freezing weather we are having here in London. And it would be sorta Christmassy. Oooh, maybe I could have some fur trim..!

Something else which has inspired me is a beautiful dress I bought from a shop we have in the UK called L.K. Bennett. They are selling some beautiful clothes at the moment – I always considered them a little old-fashioned but they appear to have really upped their game in the last couple of years (or have I just got older??). Anyway, in a massive rush last week I had to find something to wear for a party and tried on a gorgeous dress called 'Dream' (see pic left, though it doesn't do the dress justice) in a pewter / silver silk. It was just so amazing on! It fit beautifully and is brilliantly made. With the festive season looming and numerous 30th birthday celebrations (three in the space of eight days) on the horizon, combined with the fact that the dress was WELL LUSH, I took the plunge… The thing is, I suddenly started thinking how actually this is quite a simple dress and.. would it be possible… could I?... rip it off?!
'Simple' dress. Hmmm. Then I started looking at it in more detail. The fashion fabric is silk and it is self lined for the top half and with a different lining for the skirt. There is a side zip at the hip and a little opening (for getting it on) covered by a panel of fabric that has a tiny stud, to tuck into the seam. It has tiny thread loops on the inside at each shoulder seam for attaching to your bra strap (genius) which close with the same tiny studs. The front is cut from one piece of fabric and has two darts at either side. The back is made up of four panels, and has a slit at the bottom. The front waistline is, I think, actually slightly curved. The top half of the dress has a cowl front and slightly lower cowl at the back, plenty of ease around the middle and then gathers in at the waist. I thought it would look lovely in the black silk jacquard I got from Gorgeous Fabrics (the circles on which are actually translucent black, not grey – but maybe with a grey lining I would get the desired spotty effect?).

So – where do I start drafting a pattern for this?? Start from scratch (holy bejebus)? Even though I have a fantastic book on pattern drafting (which I posted about here) I've never had the time to try it out. Or should I try and find patterns with the elements I want and mash them together? Am I punching way above my weight here??

Monday 9 November 2009

Things I Shall Never Wear #3 - harem pants

OK. WTF? They weren't right on MC Hammer, they're not right now. I don't care that every shop on the high street now seems to have some variation on these monstrosities. They even look suspect on supermodels who are 5'11 and weigh seven stone. Also isn't it incredibly offputting having your crotch swishing around by your knees? Not to mention the fact that these trousers will make your legs look short even if you are six feet tall. Have any of you seen these look good?

Hopefully this wintry weather will see these horrific things consigned to the dressing up (as a 1980s popstar) box for another twenty years.

That is all.

Sunday 8 November 2009

Something is horribly wrong!

**SYNTAX ERROR, CANNOT COMPUTE!**

For some reason I can't post comments on any of the blogs I've nominated below (other than Creative Craftwork)! Not sure if it's my computer or something wrong with Google Follow (or whatever it's called) - hope to figure it out asap!

Nice lovely blog award!

The fabulous Pip a la Chic has very kindly nominated me for a Kreativ Blogger award - how exciting! Thank you very much! To accept this award, I have to:
  1. Thank the person who nominated you for this award.
  2. Copy the logo and place it on your blog.
  3. Link the person who nominated you for this award.
  4. Name 7 things about yourself that people might find interesting.
  5. Nominate 7 Kreative Bloggers.
  6. Post links to the 7 blogs you nominated.
  7. Leave a comment to each of the blogs letting them know they have been nominated.
Seven things about myself that people 'might find interesting'... hmmmm...
  • I drink an awful lot of tea
  • I can't stand snakes, even in pictures
  • I have never taken my driving test (BUT PLAN TO!)
  • the roof of my mouth freaks me out
  • I could speak in (very) short sentences before I was a year old
  • I read law at Oxford University
  • I love the UK TV show 'Eastenders'
The people I nominate are littlecottondresses for the excellent diagrams and instructions on her blog, made by meli88a for her brilliant posts about the swan dress she made, Gertie at her Blog for Better Sewing - need I say more, Lisa at Creative craftwork, one of the first sewing blogs I ever started reading, A Sewn Wardrobe for her gutsy approach to learning to sew, Creative Little Daisy for her frankly amazing posts about what can be done with sandpaper and a staple gun, and finally verypurpleperson at Sew I Do for her awesome inspirational designs.

Thursday 5 November 2009

Every jacket has a silky lining - but those DAMN RAW EDGES...

During the last week I cut out the lining for my jacket - happily the pattern came with pieces for lining - and I've been putting it together the past couple of evenings. The fabric (which I think the bloke in the shop said was Rayon) is much nicer to sew with than the acetate stuff I've used in the past, and it's also possible easier to tell the right side from the wrong side. And it's soooo nice and silky! It's a sort of taupe / chocolately colour and I think will look really nice against the fashion fabric. I am also thinking about attempting some piping (another thing on the long list of things I've never tried before) on the jacket facing - I've seen it on some coats and jackets I have and I think it looks awesome. I recently ordered Cecelia Podolak's 'Easy guide to sewing jackets' which (though pretty complicated!) has instructions on how to do it. I think I will try this in class though, I sense MUCH could go wrong if I am left completely to my own devices...

In class this week I sewed most of my lining together - just the left sleeve and peplum to do. Apologies for the terrible pics - has been stuffed in my back on the way back from class and needs a good iron... The fabric is fine to work with, but boy does it fray... I pinked the finished edges to try and shut down the fray-a-rama, which seems to have worked a bit. I pressed the seams of the lining open, and I guess it will of course all be hidden on the inside anyway, but is there something else I should be doing to these raw edges? Our teacher said not to overlock any of the edges of the lining pieces because they will all be hidden (apparently this is the approach in the industry) but I hate knowing all those raw edges will be in there... also on the curves (armholes, neckline etc) the edges have to be clipped and I guess that would make a mess of any overlocked edges anyway... I guess before I sew the lining in I will be trimming the seam allowances down anyway?

ADVICE?!

The thing that I really wanted to do in class this week was have our teacher show me her method of attaching the collar. She only managed to show me the first part (sewing up the back edge of the collar), and then the next step (attaching of the under collar and the upper collar to the bodice at the back) we will do next week.

So this week I need to (i) finish sewing the lining, and (ii) sew the peplum and pocket flaps to the shell. In class then I can set in the sleeves (with sleeve heads and shoulder pads - mental note to self: must purchase non-Dynasty type shoulder pads), attach the collar and then maybe also put in the lining...! I have only two classes left... OH GOD THE PRESSURE!


Label addict

As I've been getting more and more excited about the things I have made (and plan to make - oh the list is a long one), I've been thinking about getting some custom labels made to sew into garments I've made with my own fair hands. Seems like a really fun thing, to have your own label in clothes you've made. And the long list of things I plan to make includes lots of things for my mother, my lovely boyfriend (once I've attempted shirts) and maybe some little things for friends who are having babies... So I did a little bit of googling and found some great websites which offer custom woven labels (though I don't mind telling you, the minimum order quantity at most of these places is putting a little pressure on my rate of garment completion!). So now I have to settle on a design... I am thinking of something pretty simple and classic, on a white background.

Have any of you had labels made up? If so I'd love to see some of your designs. I need some inspiration!

Sunday 1 November 2009

Polly II

This week in class I managed to do no sewing. My homework for this week had been to cut out my fabric, lining and interfacing of my jacket of which I only achieved the former. I did purchase the lining (more on that in a separate post) and some matching thread but didn't get round to cutting it out (read "couldn't be bothered by the time 9pm on Friday night came around") - I figured I'd need to do my outer shell first in any event. I took some interfacing along to class as I wasn't sure what to use and our teacher gave me some better stuff to use (which was dark grey as opposed to the white I had, which is better for my fabric). So I spent the class shortening the sleeves (who'd have thought - those 'lengthen or shorten here' markings have an actual purpose), making sure I transferred some markings (still some left to do on the dreaded collar), cutting out the interfacing it and fusing it using this awesome machine where you feed it in at one end (no pins) and it spits it out at the other end off a little conveyor belt. It's brilliant! I think it did shrink my fabric a little but should be fine (eek). In the picture on the right you can see Maud modelling the bodice section with the front facings on the inside, all interfaced and ready to go. When I first started I was worried that the weave on the fabric I'm using was actually quite loose and the jacket would be quite flimsy when it was finished. But two layers of the fabric (at the front) plus the interfacing plus the lining is going to equal one pretty cosy jacket!

As ever, I am doing a lot of the easier construction at home before next week (the bodice sections, the sleeves, maybe the peplum, and the pockets) and I will leave the tricky bits (setting in the sleeves, attaching the collar) to the class when I can get some expert help. But when I was doing the pocket flaps I noticed some scrap offcuts of fabric, and how nice the selvedge was (picture left). I thought it might be nice to use this as trim on the pocket flaps, so I cut it into even strips and sewed it on to the right side of the outer pocket flap before sewing the flaps together and turning them the right way out. I might even make some patch pockets to go on the front of the jacket - I think the flaps look a little lonely by themselves.

I've never made patch (or any other kind of) pocket before - I'll need to find a good online tutorial or how-to, and have a look in some of my sewing books. Any suggestions of good places to learn this??

Sunday 25 October 2009

The second sleeve

The second sleeve for my jacket (I haven't named this one yet - I'm thinking Polly.. Polly the Practice!) I did at home. As I had more time, I thought I'd give the gathering technique a bash. SO I first sewed two lines of gathering stitches (see right) around the cap of the sleeve. Then I pinned the sleeve into the armhole matching the notches at the top and bottom. I gathered the threads in two halves, on each side of the top pin. One side was fine, but the other side was really stiff (maybe the two rows of gathering stitches were a little close together at some point) which made it hard to spread out the ease equally and in the right places. Once I'd gathered the threads enough to fit the sleeve to the armhole, I pinned it all together, ready for sewing.

I actually found it really hard to sew this, going around in a circle not being able to see... I wasn't a massive fan of the gathering stitch method... I found it really hard to sew the gathering without getting little folds in the seam. I think I should have sewn the two rows of gathering stitches further apart and then sewn it properly between the two lines of gathering - something our teacher did in sewing class which worked really well...

Once I'd clipped the curves and turned it the right way out, given it an iron and hemmed the peplum, it looked pretty cool! And it does fit really quite well. You can see the little tucks resulting from the dodgy gathering on the left sleeve (right as you look from the front) and also where I managed to cock up sewing on the pocket flaps... woops. I think I might put little patch pockets on the front - I always think those fake flaps look a little weird on their own. The pointy shape of the pocket flaps is echoed in the cuff of the sleeves though you can't see the cuffs very well in the pictures. As I say, I reckon they'd look much better as three quarter length sleeves...

So because I've been so slow in class, I have a LOT of homework this week. I have to cut out the pattern (other than the sleeves which I will adjust and cut in class with the benefit of our lovely teacher's expertise) in the outer fabric and the lining, and I also need to get some interlining I think (our teacher said this - I assume she means interlining as opposed to interfacing?!)... next work looks as if it could be horrific at work so this could be pretty tough!

Sleevarama


Yet another horrific journey to Curtain Road yesterday (why is it that the tube is always massively dysfunctional at the weekends??) Another cab ride from Kings Cross due to no northern line trains... anyway I digress.

This week in class I spent my time getting the stage where I was ready to - wait for it - set in a sleeve. My first ever set in sleeve. The experience was not all I'd hoped for. I spent a good half hour battling with a recalcitrant sewing machine and sewing the same seam on the sleeve about five times, then putting in the facings (I wanted a practice run at that before doing it For Real) and then I realised I hadn't sewed the side seams, or put the peplum on (GAGH)... So about about twenty minutes before the end of class I was finally at the stage of putting in the sleeve. I had managed to miss a previous demonstration by our lovely teacher, and was feeling pressured to get the sleeve in so our teacher could then help me adjust the fit if necessary, so I just went for it. The pattern instructions suggested adjusting the ease with two rows of gathering stitches, but I didn't have time for that so I just had to ease it in by hand. To be honest, I was reasonably happy with the way it turned out - see the pic at the top right, after I'd put on the right sleeve only. I tried to put most of the ease in round the cap at the top. After all that, it turns out that other than moving the bust dart down 3cm, it doesn't need any adjustments! I though perhaps maybe the sleeves were too loose but I think I am going to make the sleeves shorter anyway, 3/4 length. And there will be a bit more bulk to the whole thing once it has bulkier fashion fabric (think I am going to make it in a tweedy-type fabric I bought at Goldhawk Road in the summer - see pic left), lining and interlining. And shoulder pads - our teacher said she will show me how to put in some sleeve cap things which give a nice roll to the fabric.

Today I put in the other sleeve and hemmed the peplum - I will tell you more about that in a separate post.

Set in sleeve challenge completed!

Wednesday 21 October 2009

Insano alien models

Ok, I am not a feminist fascist in any way, shape or form but I feel compelled to post something about the ABSOLUTE CRAZINESS surrounding Ralph Lauren and those pictures at the moment.

It is incredible that a high fashion label like Ralph Lauren think that those girls in the 'extreme' airbrushed picture look good (I am LOVING how people are referring to the other as the 'untouched' image – yeh RIGHT – they are both airbrushed to death, but the 'extreme' version takes the concept to new levels). I love high fashion and I love the way that many of these 5'10", size 8 models look when they walk down the runway or appear in adverts. They are a different breed – plenty of these girls are perfectly healthy and do not have eating disorders, but are just lucky enough to have outstanding genes. However, there are times when you see girls in magazines and on the catwalk (usually the latter in my experience – perhaps because they're not airbrushed healthy!) where they look emaciated, gaunt and plain old just-too-thin. But what Ralph Lauren have done to these pictures makes the models look like aliens. It is so extreme it is laughable. I even wonder if those who are dealing with eating disorders and therefore may be particularly sensitive to such images would find the 'extreme' picture something to aspire to, in preference to the 'untouched' image.


What is perhaps most alarming is that these pictures have obviously been through various stages of approval and sign off – one assumes at a high level – in order to appear in the marketing campaign. Which must mean that more than one person within the organisation thought these were acceptable advertising images. AGAIN – didn't they learn their lesson the first time?


It all comes back to the same thing. The media (a nebulous concept I agree, but I think it unfair to limit the reference here to just fashion media) promoting an increasingly fantastical and totally unobtainable standard for women. It is remarkable that designers need to airbrush a supermodel such that her head is larger than her waist in order to promote their product. It is even more remarkable that they believe this to be a marketing strategy that will work. Or is the sad thing that it actually might??


What say you? Do they print this tosh because it actually works in getting women to buy their clothes, or have they gone too far this time?

Saturday 17 October 2009

Lapel horror


So today in sewing class I actually started sewing. Wow. Imagine the excitement! I didn't make all that much progress in class as we were watching lots of demonstrations on how to fit a dress and how to ease and gather - our teacher makes it look so easy!

Given how long everything seems to take me, I thought I'd do a little extra at home this weekend. The pic at the top right shows where I'm up to so far - the bodice with lapels completed (though the side seams aren't stitched yet, I have just pinned them together for size), beautifully modelled by dearest Maud. Though the point of making the toile is to fit the garment, I am also sort of using mine as a test run for things I've never done before (including sleeves, lapels, collars, the list is endless). Apparently for a fitting toile you don't usually cut out or sew the facings, but given how complicated the instructions seemed for this jacket (for a beginner like me anyway) I thought I'd cut out and sew the facings outside of class (though not any lining). The facings on this jacket make up the backof the lapels. Constructing them was really tricky - I don't think I transferred the pattern markings very clearly and also the instructions were really hard to follow. The picture to the left with the 'd'oh!' button shows my first attempt. The pic to my right is my second attempt, which is a little better but still not perfect. I am also worried that when I make it in the fabric fabric - which will undoubtedly be heavier than the calico(!) - it will come out even more bunchy... I think I will do this part in class so I can get the benefit of our fantastic teacher!

Has anyone got any tips on how to sew these types of lapel neatly so that everything matches?!

Friday 16 October 2009

Woops

I really don't know how it happened. Well, ok, I do. One minute I was fine, the next I was adding things to my basket like it was going out of fashion. I just had a giant splurge on Gorgeous Fabrics. Really giant. But look what I got!!

My plan was to buy some lovely fabric for my jacket and also get some stuff to inspire some new projects for work clothes. And I found some gorgeous (ha, who'd have thought it, given the site name and all that) fabric.

So I got a lovely cream silk jacquard polka dot (100%) and a lovely pale blue stretch silk charmeuse (silk/lycra mix), both of which I plan to use to make some tops for work. Maybe some nice blouses with three-quarter length sleeves, or a nice loose tank-style top.

With some autumn/winter skirts and dresses for work in mind, I also got some peachy wool flannel (100% wool) which I thought might make a nice skirt and jacket (once I have had a bash with something less nice for the jacket I'm making in class!), some posh Loro Piana dove-grey gabardine (100% wool) which would make a lush dress, and finally some blue/grey tan suiting which I think I will make into a nice skirt.
Then to line things I got some lovely grey silk habotai and a funky paisley (which is acetate...) which I think would look pretty cool as a jacket lining. Having some lovely linings might also encourage me to take more time with linings right up until the last stages of construction...


Finally, for the party season, I got some amazing black jacquard silk. Think that could be made up into a really foxy dress. Pretty intruiged to see what that will be like when it arrives, I really like the pattern.

So what do you think? How bad am I for splurging like this... I was doing so well! Any pattern suggestions gratefully received!

Sewing room cleverness

It has been so long since I posted last – my apologies. Once again work got a little crazy and the wedmin has stepped up a level while we try and nail down the venue. Anyway. Enough wedding chat, this is a sewing blog!

I must say thank you to
Pip a la Chic for tagging me in her lovely blog :-)

So my sewing course is going pretty well so far. There are some lovely people there, from lots of different backgrounds. It's really fun all learning together! The picture is of me cutting out my pattern on the lovely long cutting tables they have in the workroom.


Last week I cut out my pattern in calico to make the toile of my jacket. Our instructions have been to cut out the pattern a size or two too big, with the aim of sewing the toile together and fitting it (I guess using the excess bigness to make sure we have plenty of room for adjustments), and then I guess we will have to transfer the adjustments to the pattern afterwards, before cutting it out in the fashion fabric (which I haven't bought yet). Any suggestions for what fabric I should make this up in? I'm really interested to see how that sewing the calico together will go – so very exciting tomorrow! I will at some point have to.... SET. IN. SLEEVES. Eeek.

Which brings me on to my (or, more realistically, my bf's) next DIY project. I
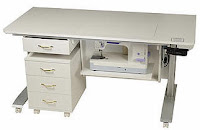
really want a bigger work surface in my sewing room (note I now refer to our study as 'my sewing room' – heh) which is sewing friendly and versatile. I had a look on the internet at what is out there and found that Horn do an awesome adjustable height table (the Horn Professional 3002) which has their 'airlift' system for hiding your sewing machine under the table when you're not using it. It also lets you, with the help of a specially cut insert, use your machine in a flatbed configuration which I think would be awesome. And it has electrically adjustable legs. This is a real luxury, but I think I could live without that functionality. The bad news is that this awesome piece of kit is £2500.


I think I can do better than that. I think that
the airlifter plus some adjustable legs plus a table top can be fashioned into exactly what I'm after for less than ten per cent of the cost, albeit the height will be adjustable only manually. I can then buy the insert from one of the companies that sell them (for the flatbed option). I am even wondering whether it is possible to have two openings and airlifts - one for my overlocker and one for my sewing machine...


What do you think? Has anyone had any experience in making a custom made sewing table? Or has anyone found anything like the Horn one above which is more affordable?!

Thursday 1 October 2009

Back to school!

Howdy.. I have been stupid-busy at work for the last week or so and have barely had a chance to do any sewing other than on Saturday when I had my first session of the London College of Fashion course I've started. SO MUCH FUN! All we really did was measure ourselves, learn how to thread the industrial sewing machines and sew in straight lines, but so exciting! And WOWZERS those industrial machines are speedy... I had to barely press my foot on the pedal to get a speed I could manage.


We have to bring a pattern to class this week which will be what forms the basis of our course; we make it up as a toile in calico and then in the fabric we have chosen, with Hilary (our lovely teacher) teaching us 'professional fit and finish' on the way. I think I am going to choose a jacket - to get my money's worth! I've never made a jacket (or, as you may be aware, anything with sleeves) and so it would be good to make my first one under supervision. I think I might do the Burda jacket above - it looks like a nice shape and I could really do with a new jacket for work. Though I note that I might never actually want to wear the product of my labours... But looking forward to adjusting my pattern and stuff all the same.


Speaking of patterns, I must mention a book I bought on the advice of commenter Arielle - it is called 'Make Your Own Dress Patterns' by Adele P. Margolis. It is absolutely brilliant! It has loads of simple explanations and illustrations of how to manipulate a basic bodice sloper. I have so far just been reading it, but can't wait to get some pattern paper out and start slashing and spreading! Oh, I also need to make a sloper first..... I made a skirt sloper a little while ago and posted about it here but to be honest I'm not sure it is a perfect fit. Watch this space!

Tuesday 22 September 2009

Admin top

So I have finally managed to do some sewing this week, and have started putting together the top for work from the Burda pattern I talked about in my earlier post. I've called it 'Admin' as I reckon this one will be confined to wear in the office. So the fabric I'm making this from is a sort of creased stretchy crepe - the photo here isn't great but you can probably see it looks all wavy, sort of like stone. It has a LOT of stretch widthways (from selvedge to selvedge - is that widthways?!) and not much lengthways, which has made it really awkward to mark, cut pin and sew (more on that in a second). I have been using a lot of pins...

The pattern is made of four basic pieces - front (cut on the fold), back left, back right and a bit for the collar. The first thing to do was to sew the shoulder seams (ie front to back right and front to back left), which I did on my machine and then neatened the edges with my overlocker.

I should have thought ahead that of course the stretchiness of the fabric would likely mean some adjustments to the settings on the overlocker... after I'd done the first shoulder I realised, and twiddled one of the knobs on the side to try and
stop it stretching the fabric out so much. You can see the first seam at the bottom of the pic, and the second at the top. The second seam is far from perfect but much better than the first. Practice makes perfect I guess! Once I'd done the shoulder seams, I neatened to edges of each centre back pieces and then sewed them together, pressing the seams open. The next tricky bit was the collar - mainly because of the floppy fabric.... it has rouleaux loops to fasten at the back and pinning and stitching those was really hard. It also requires hand finishing - the collar piece is an oblong folded over, with the rouleaux loops sandwiched between the short ends, and the inside of the collar stitched to the seam line of the front side of the fold (does that make sense?!). Anyway, I've pinned that and the hand sewing shall have to wait for another day...

I'll post more pictures when I'm done :-)


Thursday 17 September 2009

Happy birthday to me!

Today is my birthday! Another year older, not so sure about the wiser bit... Anyway, out for supper to my favourite restaurant tonight with my lovely finance which should be awesome.

What about the sewing, I hear you say. Well, I recently received in the post a Burda pattern I ordered ages ago but which was out of stock - pattern 7576. It has a simple top similar to those I mentioned in my previous posts here and here, but appeared to be a bit less complicated (and at the time I couldn't be bothered with tracing out the free Burda patters from the magazine...). It actually only has three main pattern pieces - woo hoo. I have cut it out in a sort of crinkle crepe in black which I got on sale in Peter Jones (mental note - crinkly fabrics = annoying to cut), with the idea of wearing it for work. Is it just me, or does getting the fabric ready, pinning the pattern and cutting it out take ages?! I think I might be particularly slow...
We are away this weekend for our first of two engagement parties so won't get to do any sewing, but am hoping to finish it next week; need to have done a bit of sewing before my course starts next Saturday! Speaking of which I need to make sure I have all the bits and pieces I am supposed to have on my first day - scissors, rulers, chalk... think I have most of it but might give me an excuse to buy some new sewing stuff. Really hope I'm not too out of my depth....