
My only concern with this knitting malarkey is the temptation of.... yarn stash!

.JPG)

 I am really looking forward to doing some proper real-live tailoring with the sew-along.. though I have a fair way to go before I reach that stage. I still haven't cut out my muslin! It's going to be a big day Chez Cybersewer on Sunday! We have a wedding on Saturday so I need to NOT get too hungover, and we must go to church on Sunday - haven't been for absolutely weeks!

 So later than promised in my previous post, some pics of the baby quilt I made for my sister's imminent arrival. It is by no means perfect (don't look too close at ANY of the blocks) but I'm pretty pleased with it because it looks like something I would like to have around the house. The back is just all one fabric. I think it's a good size for either a cot quilt or a playmat. Hopefully it will get some use.
 So back to garment sewing... It is with great excitement that I await my Lady Grey coat pattern from Colette Patterns so I can get cracking with Gertie's fantabulous coat sew along. It has dispatched so should be here any day now... pretty excited about getting all the supplies ready and also learning some funky tailoring techniqiues. I have never joined a sew-along before, but I think it will suit me pretty well. I have no issues testing things out, finding supplies and resources, but what I really lack is the discipline to keep sewing regularly - even if only for half an hour a day! I'm hoping the structure of the sew-along will help with that.

 Excuse the lack of ironing, it needs a good press before the next stage. I did a French seam on the side seams but annoyingly forgot to trim the seam allowance before sewing the second part of the seam, so I have some little threads poking out of the seam on the outside which will need trimming. I am so far pretty pleased with how this is working out, though a bit nervous about putting the zipper in with the lining... also not sure about the pleat at the
  bottom and how long to finish them hem - will I need the pleat? I think this dress will look awesome with a funky belt and my lovely Chloe wedges. I'm going to try and finish it in the next week or so, my parents are visiting in a couple of weeks and would love to be able to wear it out to lunch with them.
 The pink Burda dress horror was doing my head in - I decided to put it
  I have so far finished the bodice which looks good so far - I really like the pleats on the neckline and the sweetheart shape at the front is pretty cool. I am really keen to finish this dress as professionally as possible - and I wanted to understitch the lining to the seam allowances as per the instructions (which say to understitch 'as far as possible'). The annoying thing is that the instructions said to do that after I'd sewn the lining and the fabric together at the neckline and armholes - and the curves just wouldn't let me get the sewing machine all the way around. I couldn't just go part of the way and stop - it would look odd on the inside surely??


 This time, with the help of Ikea and my lovely husband, I have a lovely nice long sewing table, more drawer space and some cool shelves to put stuff on. It's so nice being able to really stretch out and have a clear space for sewing, and also to look out of the window onto the gardens!
 I have been sewing - but not much posting! I made a start on Burda 113 from the 8/2009 edition in some lovely silk. I have so far almost finished the top half - I used some of the gorgeous cerise silk I got on Goldhawk Road a few weeks ago. Frustratingly though, I must have added on too much seam allowance at the bottom of the back, because after sewing the side seams I realised that there is too much fabric i the back armhole - you might just be able to see from the pic how there is too much floatiness going on in the back of the sleeves? Also, again, REALLY frustratingly, I must have done something wrong on the ruched front self facing because it wasn't long enough to actually make a self facing for the inside front, so the seam is on the neckline. For some stupid reason, I sewed this with a zig zag stitch, which you can see peeking through the fabric.
  maybe sew another bit of the cerise silk long enough to fold to the inside and make the self facing? Notice how from the front the bottom edge is curved - I think it is supposed to be straight so maybe I have more fabric I can pull up and wrap over to form the self facing...? Another issue I think is that the silk is heavy so it pulls the inside lining up where the self facing is supposed to be (does that make sense?) - maybe once the lining is sewed at the waist it will be a bit better.
 While surfing the sewing interweb, I found this and thought it was such a cool picture. Then I found the blog of Texas Freckles, and read about her hexagon piece-along. And thought I might have a little go... the thought of hand sewing I could do almost anywhere was awesome - a little bit at a time whenever I have a spare few moments. And a weird and funky quilt to show for it at the end! So I printed out some sheets of 1" hexagons to cut up
 and found some scraps of fabric I had leftover.... wow - it is so addictive! But awesome fun. The patch of sewn toghether hexes I did just to see whether I would in fact be able to sew them together neatly, but it all turned out ok for that little sample. It takes something crazy like one thousand 1" hexagons to make a sensibly sized quilt. Maybe I will get bored before then... but it is so nice to have something creative to do while
  sitting on the sofa watching Hollyoaks (busted). I think I am going to piece the hexagons together in bands 3 or four wide diagonally - one strip coloured and then one made up of only off-white coloured hexagons. There are lots of ideas out there. The only thing that stands between me and a fab hand sewn quilt is about... oh, 900 hexagons??
 In light of my recent foray into quilting, I have be doing a little cyber-browsing of quilting blogs and websites. Wowzers – quilting is VERY popular in the US! Not sure what other UK sewists have found, but I have noticed that sewing and quilting is much more popular in the US than it is here. Or at the very least, there are a lot fewer people who blog about it here… There has been a resurgence of crafting in the UK – particularly with respect to knitting which has become very trendy in the past couple of years (I am STILL knitting the back of a baby cardigan I started AGES ago – the bloody pattern is written in Greek or something) – a result of the credit crunch and the desire to improvise mainly, but I think people have also started to realize how satisfying it can be to make things; either for yourself or to give away. I haven't yet got to the stage where I have (a) made very many things, or (b) considered that any of the things I have made would be welcome gifts. That is something I hope quilting might fix – quilts must make lovely presents. I know I'd love to be given one! If only they didn't take so long to make… though I think that is probably just practice. And the fact that the quilt I have decided to make as my first appears to have about one billion teeny tiny pieces (I am prone to exaggeration).
 My new sewing machine came with, like, a zillion new feet. I have only experimented with about three of them so far, but - THESE LITTLE FEET DO ALL SORTS OF COOL STUFF! Rolled hem foot -BOOM - nice little neat rolled hem! I'm not absolutely certain I'm using it properly though - the instructions in the manual aren't the most clear... but it seems to produce an ok result... how do I know exactly how wide to finger-fold the hem??...
  My sewing-related spending binge has continued unchecked (this is REALLY IT for
  |
Woops.
I won't even bother with the faux oh-how-did-I-manage-to-spend-so-much-on-yet-more-fabric apology. There was fabric shopping. The end.
But BEHOLD!
This paint splattery lushness I got from MacCulloch & Wallis on Tuesday. It was pretty spenny... and probably not to everyone's taste, but I  thought so amazing! It is a cotton with something (cannot remember now due to excitement, but I did find out) woven on top, very slightly metallic. But isn't the print really Marc Jacobs or Matthew Williamson-esque?? I love it. It will make such a funky dress (or maybe summer coat - but not sure I'm brave enough to try a coat yet) - desperate to find the right pattern for it though. It has quite a bit of body (is that the right word?), I think because of the sort of two layer thing it has going on.
Any suggestions? 
Then from Shaukat I got two pieces of Liberty silk - one funky peacock feather purple which I thought would make a nice sort of slinky but
not-too-clingy dress... Quite an unusual fabric I thought - but it felt amazing! I have never sewed with this type of silky silk before (as opposed to dupion type which I made Jackie from) so not sure how I will fare...
The second piece was a little more
conventional and I thought would make a nice tea dress - the print is actually quite small and in a pale blue - from a distance the fabric looks a lot lighter than in this close up shot. But how nice for Sunday tea or lunch with the in-laws, don'tchathink?
I need some pattern suggestions... I also picked up a load of cheap cotton for making toiles which the lady at MacCulloch & Wallis kindly sold me for 50p a metre as it was a bit dusty. So armed and dangerous! I acquired the Michael Kors Vogue 1117 which I am so keen to try but concerned it might be a bit advanced...?! The thought of cutting into this prime stash is pretty nerve racking... Though that's what all that cheap cotton is for, right??
Armed with fabric and certainly dangerous - roll on the next big sewing sesh!
 Over the bank holiday weekend I finally finished the Burda top I started here - I thought it very disciplined of me to finish it before moving on to the next project. Here are a few pics of it. I am generally happy with it, though I didn't bother making the button holes on the sleeves (just sewed on buttons as trimming) as I didn't need to be able to open and close the vents. Similarly I didn't bother with the tie side, just left it plain and sewed another button on there too. The finish on the neckline is a bit dull and I wish I had done something a bit more interesting or fun
 than the pattern directed - maybe just put the binding on so you could see it from the front too. I used french seams for all of the seams, after being inspired by the incredibly neat finish on all of Amanda's creations - I guess practice will eventually make somewhere closer to perfect for me..!

 Anyway, to get me back in the sewing groove I thought I'd start with (or really, continue with) the quilt I started months ago. Although I am primarily learning to sew to make clothes, I really love gorgeous bed linen and I thought it awesome to have some colourful quilts to chuck over plain white sheets (I buy almost exclusively plain white bed linen - looks so clean and fresh!) and a few months ago I bought this lovely book called Jelly Roll Quilts by Pam & Nicky Lintott and started a cool looking quilt called 'Sparkling Gemstones' (I know, bit lame) with some fat quarters I had bought for the purpose. Then the
  wedmin got me... so I picked it up today thinking I'll crack on with a few straight lines to get me warmed up before starting my next fashion proj. Though boring, sewing in a straight line is quite mindless and theraputic (in small doses!).
 I am back! From the crazy planning, flower-choosing, dress-fitting, menu-tasting mayhem of wedmin. I am now Mrs! In the months since Christmas I don't think I've had a spare weekend to myself. The wedding was absolutely beautiful though, definitely the best day of my life. The dress was fabulous, everything was just perfect. And I am now married to the man of my dreams. We got back from an amazing honeymoon on Monday, and I have been so looking forwad to getting back on the sewing bandwagon.
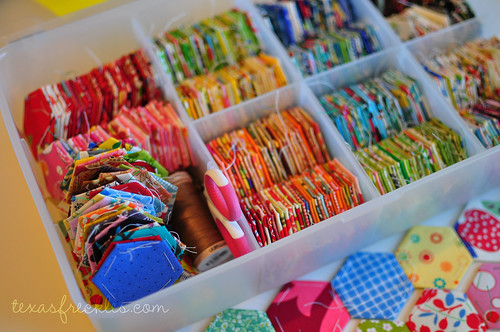